


Also, note that the selective symmetry operator is applied over the gradient map (not the binary edge map) generated from these higher resolution images. However, the gradient map magnitudes are replaced by the square-root of the magnitude. This attenuates the effect of contrast in the calculation of symmetric enclosure. The facial contour is not necessarily of high contrast against the background and this is especially true of the chin area. The chin and the neck are composed of the same skin tone and thus the contrast generated from this contour between the two is only due to the foreshortening of the chin and the shading below it. Thus, a reduced sensitivity to contrast allows the selective symmetry detector to detect the strong sense of symmetric enclosure the chin contour brings to the facial structure despite its rather weak edge content.
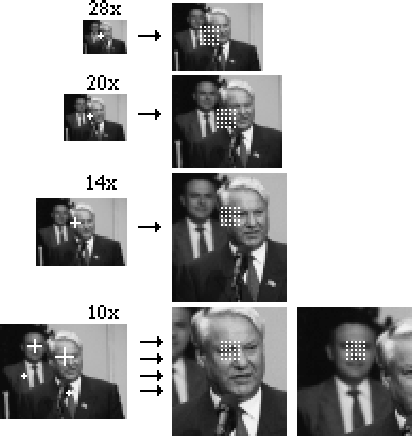
Figure ![[*]](http://vismod.www.media.mit.edu/vismod/support/latex2html-98//cross_ref_motif.gif) depicts the use of the local maxima in the interest map
to define the search space for the selective symmetry detector. The interest
map peaks at scales 28, 20 ,14 and 10 are shown on the left side of the
Figure. Note the 5
depicts the use of the local maxima in the interest map
to define the search space for the selective symmetry detector. The interest
map peaks at scales 28, 20 ,14 and 10 are shown on the left side of the
Figure. Note the 5 ![]() 5 window of dots forming a neighbourhood around
these peaks in the images on the right. These images on the right side are
higher resolution versions of the ones on the left (double the resolution) and
will be operated upon by the selective symmetry detector at each of the 25
white points within them. This process is performed first at large scales (at
scale 28 in the example). This agrees with the notion that large scales are
usually more perceptually significant. Subsequently, we use the selective
symmetry operator to compute the structure of the blob more exactly.
5 window of dots forming a neighbourhood around
these peaks in the images on the right. These images on the right side are
higher resolution versions of the ones on the left (double the resolution) and
will be operated upon by the selective symmetry detector at each of the 25
white points within them. This process is performed first at large scales (at
scale 28 in the example). This agrees with the notion that large scales are
usually more perceptually significant. Subsequently, we use the selective
symmetry operator to compute the structure of the blob more exactly.
Recall that the selective symmetry detector requires the creation of templates
as explained in Chapter 2. We wish to detect facial contours at a variety of
orientations to detect tilted heads as well as vertical ones. It is necessary
to expect different aspect ratios as some individuals have wide faces/heads
while others have slim, elongated ones. Furthermore, recall the discrete
sampling of scale-space that generated the multi-scalar interest maps. The
intervals between scales require a certain scale flexibility of the operators.
For instance, in Figure we note that the image is scaled down
by 28![]() and 20
and 20![]() .
Thus, an operator acting on these two images
must span the intermediate scales to assure full coverage in scale
space. Thus, the operator must be a thick annulus that overlaps itself when
it is scaled by a ratio of
.
Thus, an operator acting on these two images
must span the intermediate scales to assure full coverage in scale
space. Thus, the operator must be a thick annulus that overlaps itself when
it is scaled by a ratio of
![]() to assure that there are no gaps in
the sampling of scale-space. The symmetry transform had 6 rings of different
radii. Similarly, the selective symmetry detector should have multiple
template sizes as well so that the operator overlaps in scale-space. Thus we
need to create templates with various orientations, aspect ratios and sizes.
to assure that there are no gaps in
the sampling of scale-space. The symmetry transform had 6 rings of different
radii. Similarly, the selective symmetry detector should have multiple
template sizes as well so that the operator overlaps in scale-space. Thus we
need to create templates with various orientations, aspect ratios and sizes.
We also need to guarantee a certain level of overlap between templates. For
example, observe Figure which displays 3 templates of
a head with the following orientations: along the vertical, at +60 degrees
from the vertical and at -60 degrees from the vertical. If a face is
encountered at -30 degrees from the vertical, we will probably not detect it.
What is needed is a certain amount of overlap between one template and the
next so that intermediate face contours will be detected. Thus, we must finely
sample the orientation, aspect ratio and size ranges in our template creation
process to ensure overlap. We seek roughly 50% area overlap between
neighbouring templates. Furthermore, when we proposed the search space for the
selective symmetry operator as a 25-point neighbourhood we sampled the search
space appropriately to ensure proper coverage as well. In other words, we do
not have gaps in the spatial domain. The thick annular operator overlaps the
search area well since the (x,y) points at which we apply the selective
symmetry operation are densely arranged.
Figure displays all the required templates once we have
sampled the semi-elliptical model's scale-space, orientation space and aspect
ratio space, appropriately. In total, we consider 5 possible
orientations: -30, -15, 0, 15 and 30 degrees from the vertical, 3 scales and 2
aspect ratios for a total of 30 templates. The model described in Chapter 2 is
utilized with a=b and
![]() .
The
.
The ![]() parameter of the
model is the orientation. Finally, the t parameter is set to
parameter of the
model is the orientation. Finally, the t parameter is set to
![]() so that the annular sampling regions overlap adequately.
so that the annular sampling regions overlap adequately.
Each of the templates is applied with its center aligned to each of the 25
points forming the search space of the selective symmetry detector. For each
template at each of the 25 positions, we compute a value of SE, as shown in
Equation . The template which generates the highest value
of SE will be the estimate for the facial contour for the given peak in the
interest map.
For each blob, we exhaustively attempt each template matching and the
strongest template is our final estimate for the facial contour. It must
generate a certain minimal value of SE for it to be a legitimate facial
contour. We select a threshold on the value of SE at 25%. Recall that the
value of SE is expressed as a percentage of the peak value that can trigger
the template in question. If the best template at the given peak is weaker
than 25%, it will be rejected, indicating that the interest map peak was
generated by another structure which does not fit the shape of the face
templates. Thus, certain points in the interest map will be rejected as
non-faces at this stage if they fail to trigger the face templates adequately.
The threshold value of 25% on the facial contour detection is a very tolerant
one. All faces tested generated values of SE significantly above 25%.
However, other non-facial yet symmetric structures will be discarded. The
estimates for the facial contours resulting from the local peaks in the
interest maps in Figure are displayed as darkened annular
regions superimposed upon the input intensity images as shown in
Figure .
There is successful and precise detection of both face contours in cases (d)
and (e) despite the variation in scale, focus, pose and illumination.
Unfortunately, non-face structures also triggered the face contour detector as
seen in cases (a), (b) and (c). The larger contours are triggered in part by
the high contrast in the clothing of the individuals. Furthermore, the close
proximity of the heads of the two individuals causes the selective symmetry
detector to utilize contours from both faces in the image simultaneously.
However, had a single face been the dominant object in the image, the contour
detection would have triggered fewer false alarms. Once again, false alarms
are permissible at this stage since further testing and elimination will
subsequently fine-tune the output. It is critical, though, that there are no
misses at this stage since we only propagate the data that generated adequate
facial contours to the subsequent testing stages in our hierarchy.
Figure depicts a situation where the face is dominant in an
image and hence the only detected facial contour is the one corresponding to
the actual face in the image.
Figures and do not show the search space
(25 white points) or the facial contour estimate for the two weakest peaks in
the interest map at the 10x scale. This is because these points failed to
generate values greater than 25% for any of the face/head templates. This is
understandable since they are triggered by the clothing of the individuals in
the scene (not faces). Thus, this selective symmetry detector stage not only
refines the localization of the face's center, it detects facial contour
structure and also filters out non-face-like blobs from the output of the
interest map. The final output is a collection of possible facial contours
whose interior must now be processed to determine the existence of appropriate
facial features.


![\begin{figure}\center
\begin{tabular}[b]{ccccc}
\epsfig{file=locs/figs/faceA.p...
...cm}\\
(a) & (b) & (c) & (d) & (e)
\end{tabular}\\ \vspace*{0.5cm}
\end{figure}](img79.gif)
![\begin{figure}% latex2html id marker 1165
\center
\begin{tabular}[b]{cc}
\epsf...
...ge. (a) Original intensity
image. (b) Only face contour detected. }\end{figure}](img80.gif)