Hardware Setup and Configuration
|
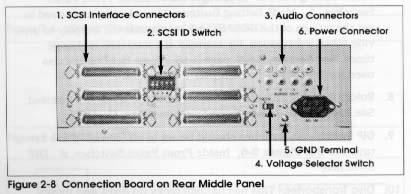
The jukebox arrived without cables or manuals. Jonathon Lennox ordered corresponding SCSI manuals and Raj Kumar found a suitable 68 pin SCSI-2 to centronics cable which could be used for connection to either the Sparc Ultra ind.cs or the Gateway 2000 Pentium-Pro njt.cs.
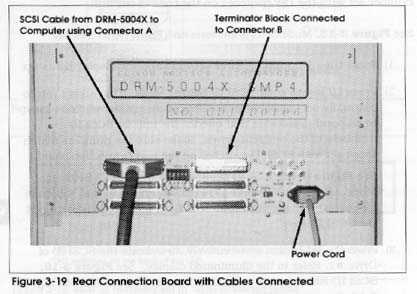
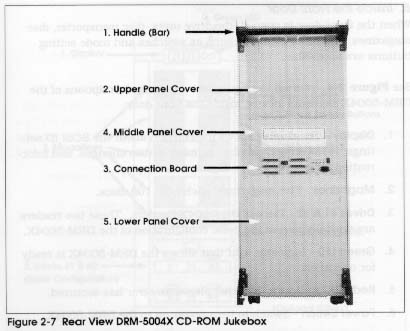
A power cable was easily obtained from the lower storage area of the IRT Lab. Initially, however, when powered-up the jukebox did not respond to attempts to engage any of the self-tests. The problem was a blown 1.5A/125V fuse located behind the upper back panel (H107-H108). I replaced it with a similar fuse found in the CRF supply room (correspondence).
Since the jukebox was not at the time connected to any machine, it was necessary to manually terminate the first of the CDROM drives by setting the two dip switches on the right side of the drive down (see illustration).
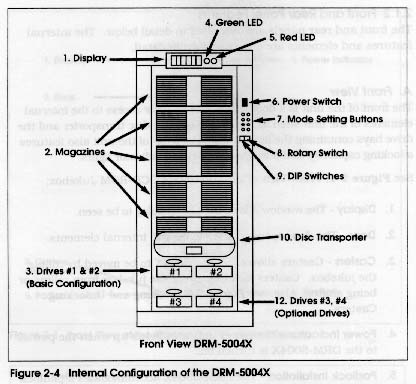
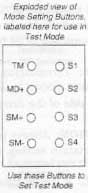
 At this point it was possible to enter the test mode by opening the door, inserting the 'door-jig' (I used a pen cap) into the safety-switch socket located midway down on the right side, and pressing and holding the TM button for 3 seconds.
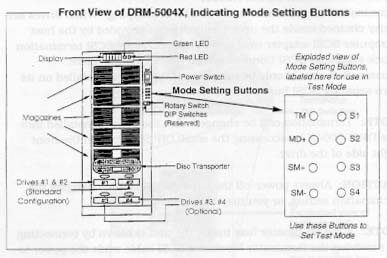
When in test mode, the LED Display window at the top of the jukebox lights up
displaying the changer firmware version. This is mode 0 as signified by the
far left digit of the display. The user cycles through all 7 modes using the
MD+ button. Within each mode there are several submodes indicated by
the 2nd digit from the left. These submodes can be cycled through using the
SM+ and SM- buttons. The three digits on the left display
coded information. The four buttons on the right (S1, S2, S3, S4) are used
to manipulate this information.

The useful debugging modes are:
The user has complete control over the type and duration of all transporter movement
Step Operation Mode (4) The user has control of the discrete steps involved in loading and unloading a CD
Button assignments:
In Mode 4, illegal moves are prevented, an error is reported and the red exception light starts flashing. To continue after an error occurs, it is necessary to acknowledge the error by cycling the MD+ button past the error history modes (1 and 2). The manual advises caution when using Mode 3, as illegal and potentially damaging moves are not blocked. Aging Mode (5) will work for one complete cycle only. By repetition, it was found that the all discs were not returned to their original positions; The were all situated one slot down respectively. The aging mode expects the discs to be returned to their original positions, so an error was reported and the test halted after only one cycle. Pioneer Tech support suggested the re-initialization of the jukebox using WMOUNT.EXE However, this software could not be run on njt.cs because it lacked a specific SCSI software installation (similar, but older software exists on view.cs, but its installation did not seem to effect any change). Regardless, the problem appeared only to effect the operation of the aging test mode (correspondence).
The general procedure to load a CD from slot XYZ of a loaded magazine into a drive:
The general procedure to manually remove a CD from a drive and position it in slot XYZ are essentially the reverse of the above.
Using an 8-inch centronics-centronics cable borrowed from Bill Paul and a set of Slackware Linux boot disks Jonathon and I were able to obtain root access to view.cs and manually load and mount cdroms from all four jukebox drives. Ion from CRF recompiled the kernel to support SCSI and provided additional help.Jonathon installed a Linux audio player, and we were able to play an audio CD. This verified that the jukebox CDROM drives and SCSI connection worked (correspondence). |