Search Engine
Columbia Weather and Illumination Database (WILD) is an extensive database of high quality, calibrated images of a static outdoor scene captured under all seasons, lighting and weather conditions. The two DVDs distributed contain a subset (around 850 images) of this large dataset that includes a wide variety of seasons, lighting and weather changes. For details regarding the database itself, please refer to our paper mentioned on the [ Publications page ]. This page provides instructions on how to use our matlab search engine to find images of the WILD database according to the stored ground truth data. |
Software Requirements
The search engine tool was tested on windows NT/2000/XP. Basic Matlab (version 6) and Image Processing (version 3.1) toolboxes are needed for full functionality. If Matlab is not available, a standalone exe version for a PC (Win32 Console Application) can be used with lower functionality. The Matlab Compiler Version 3.0 was used to compile the Matlab-based search engine into a standalone application.
Note that both the matlab and exe versions of the search engine are included with the Image datasets distributed on 2 DVDs. If you do not have the WILD DVDs, then you can just download the search engine software from [ here ]. Even without the DVDs you can browse the TYPES of images (based on atmospheric conditions and other [ ground truth information ]) packaged on the DVDs, using the search engine software. This will help in deciding whether or not the image sets are useful to your research activities. |
Software Installation Instructions
(i) To run the matlab version:
(a) Start Matlab and change the current matlab directory to the directory where the matlab (.m) files and the Image Database are present. If you have a WILD DVD, you can run the search engine off the DVD itself. There is no need to copy the entire database (several giga bytes of data) onto a local directory.
(b) From the matlab command prompt, type "search_wild"
(ii) To run the standalone exe version:
(a) If you have the WILD DVDs, you must set the SYSTEM PATH variable to <DVD_DRIVE_LETTER>:WILD_DVD_Clear\bin\win32 or <DVD_DRIVE_LETTER>:WILD_DVD_BadWeather\bin\win32. If you copy the contents of the DVD to your hard drive location <USER_LOCATION>, then you must set the SYSTEM PATH variable to <USER_LOCATION>:\bin\win32.
(b) Run either clear_search_wild.exe to browse the clear weather database (DVD1) or weather_search_wild.exe to browse the bad weather database (DVD2).
(iii) If you just want to browse the types of image sets without getting the DVDs, then please download the installable zip file from [ here ] and follow the instructions given in [ 1STREADME.txt ]. |
Common Problems and Bugs (To be updated regularly)
If the search engine GUI does not appear correctly, please increase the resolution of your display and restart the search engine software. If the standalone application complains that it could not find a dll or an entry point, the SYSTEM PATH to <USR_SPECIFIED_DIR>\bin\win32 is probably not set correctly. Please try to reset the system PATH variable. If the problem persists, please try to remove any matlab paths that may have been set before in the SYSTEM PATH.
Please report any other problems to wild@cs.columbia.edu |
How to use the search engine tool
This section provides step by step instructions on how to use the search engine tool with screen shots of the tool in operation. |
| |
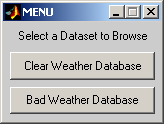
STEP 1
When search_wild.exe or the matlab file search_wild.m is executed, a small Menu GUI pops up asking user to select either the Clear Weather Database or the Bad Weather Database. Accordingly, the appropriate database contents are loaded into the search engine. Note that the search engine files must be placed in the directory where ClearWeatherDatabase or BadWeatherDatabase exists.
|
| |
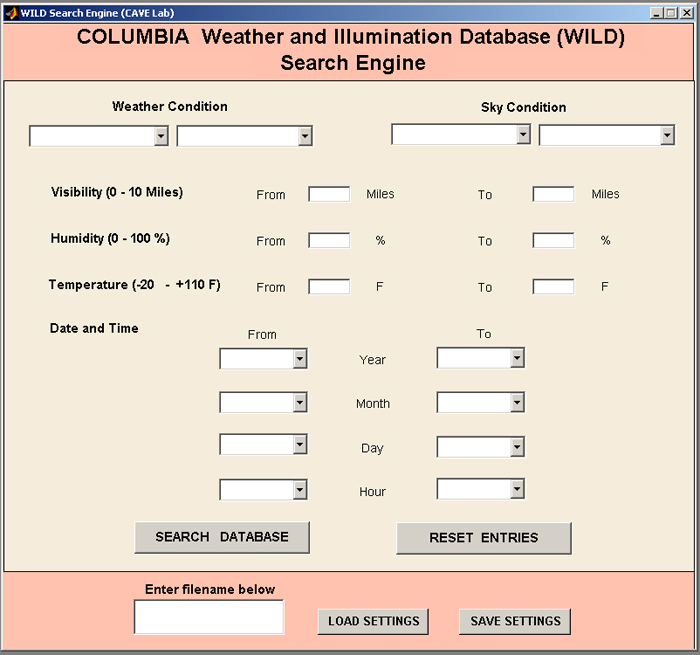
STEP 2
When one of the database buttons in the above step is clicked, the basic user interface for the search engine appears as shown below.
|
| |
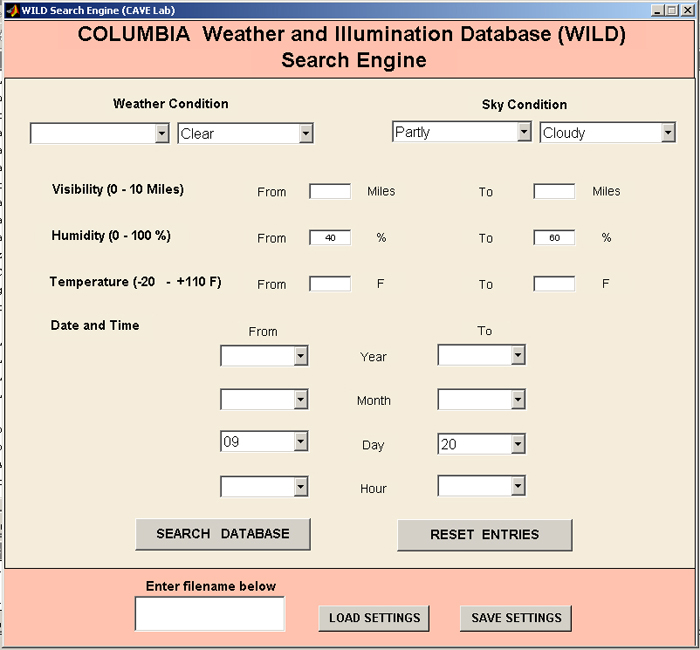
STEP 3
Fill the required entries in the search engine user interface. An example is shown below, where we want to search for images that were taken in clear weather, but under partly cloudy skies, the humidity between 40 and 60 percent, the time of day being between 9 AM and 8 PM. The entries left unfilled can take on any values.
|
| |
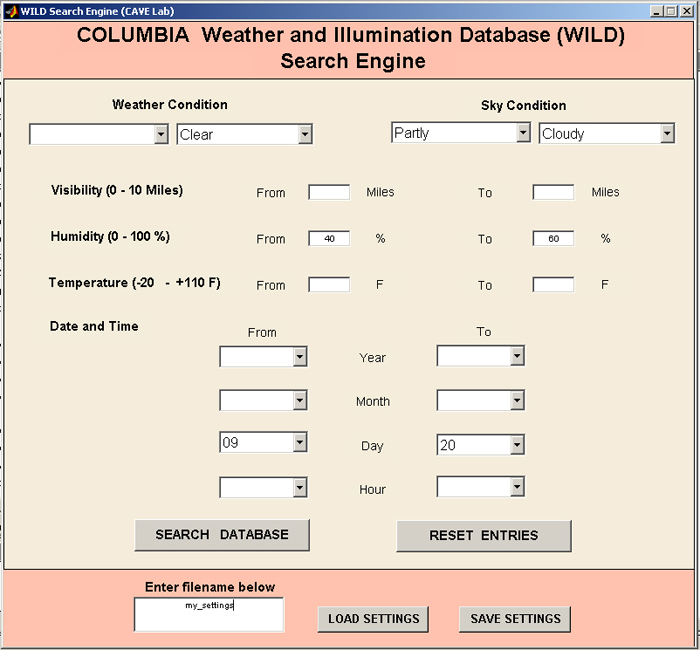
STEP 4
To save the settings you have entered, you can provide a filename in the bottom of the GUI as shown below and press the SAVE SETTINGS button. To load the settings again, type in the filename and click on the LOAD SETTINGS button. The extension of the filename should be ".mat". If no extension is provided, then the default extension (.mat) is added. If the filename is given without a path, the file is created in the current directory. When running this software from the DVD, this can result in an error. Therefore, to avoid this problem, please specify the full path where the file can be created.
|
| |
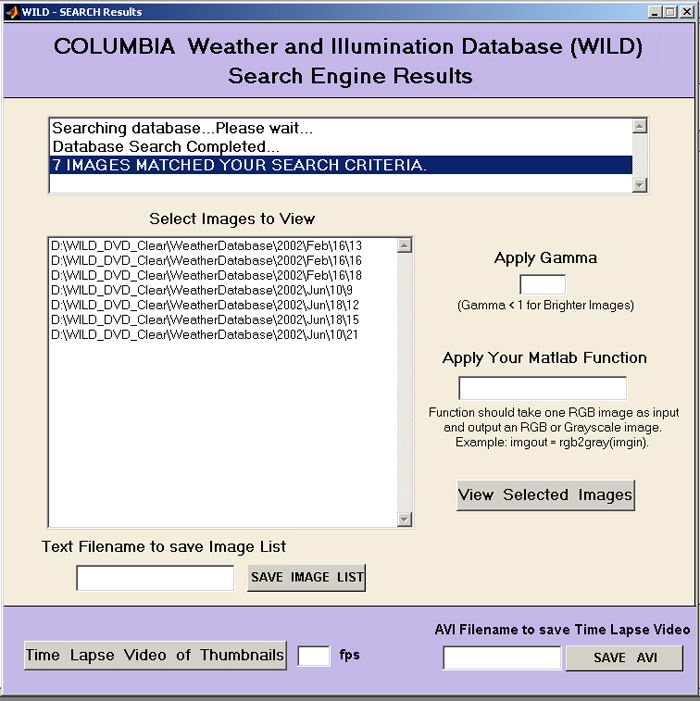
STEP 5
Click on the "Search Database" button to get the search results. This pops up another user interface that contains the list of images that satisfied your criteria. If the search criteria are incorrect, then an appropriate error message is posted on the results GUI. If the search criteria are too specific (for eg., all images taken when the humidity level was between 35 and 40 percent), there might be very few or no images that match the search criteria exactly. Try again by relaxing some of the requirements.
The locations/paths of the images are shown in this GUI. The images are stored according to their capture time. For example, the path D:\WILD_DVD_Clear\WeatherDatabase\2002\Jun\10\21 denotes that the image was captured at 9PM, on 10th June 2002.
|
| |
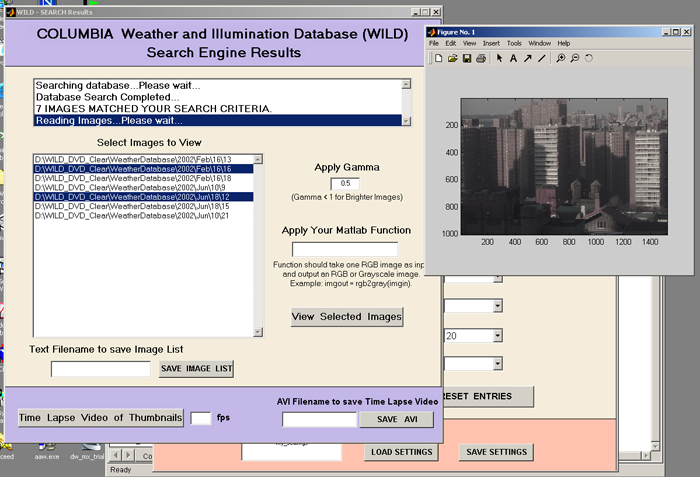
STEP 6
The results GUI can be used to visualize the images that matched your search criteria. The images in the database are radiometrically linearized (linear radiometric response function) and tend to be dark. To visualize the images, input the gamma value (less than 1 means brighter), select the images to view, and hit the "View Selected Images" button as shown in the screen shot below.
Note that the application of gamma is only for visualization and does not change the image stored in the database.
|
| |
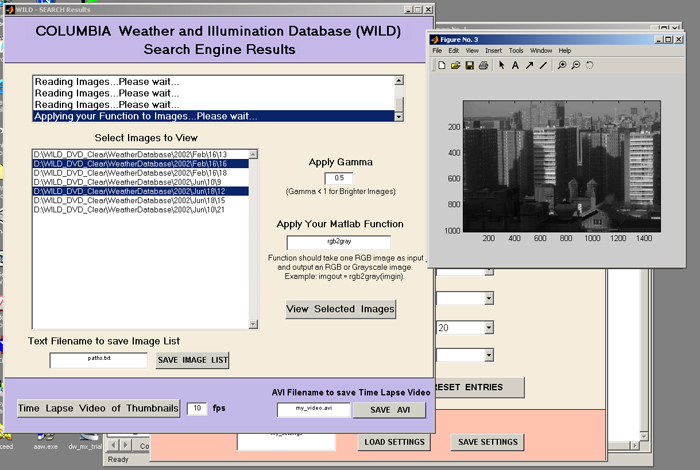
STEP 7
Another advanced option is given to users who wish to apply their own matlab function to selected images. This function should be of the form:
outputImage = function(inputImage)
For example, to visualize only a gray scale version of the image, then "rgb2gray" can be typed in the space provided (see the screen shot below.)
NOTE: This search engine is not a tool to process images but a few options such as gamma correction are provided for visualization purposes only. Users cannot apply their own matlab functions using the standalone Win32 console application (.exe) version of the search engine. Matlab is required for this functionality.
|
| |
STEP 8
The "View Selected Images" button is used to view images at full resolution (1520 x 1008, 16 bits per pixel per color channel) and thus might take a long time to load and to apply the users' function (gamma or rgb2gray, say). For a faster visualization, an option of viewing pre-computed low resolution thumbnails of the images are provided. The image processing functions gamma, etc) cannot be applied by the user to these thumbnails. The user can select a set of images and view a time lapse video of the thumbnail versions of the selected images. This is helpful in deciding how to prune the image set further. The time lapse video can also be saved as an uncompressed avi file. Refer to figure in Step 6 for details.
Note that users cannot save the time lapse videos as AVI files using the standalone Win32 console application (.exe) version of the search engine. Matlab is required for this functionality.
|
| |
STEP 9
The paths to the images that matched the users search criteria can be saved in a text file. If the filename is given without a path, the file is created in the current directory. When running this software from the DVD, this can result in an error. Therefore, to avoid this problem, please specify the full path where the file can be created.
Refer to figure in Step 6.
|
|
|
|