
Lab 1 is due 11:59pm ET 10/24.
Lab 1: Static NULL Dereference Checker
Heap memory allocation functions such as malloc() may return NULL if there is not enough memory. A robust program such as a web server should check the return value of a heap allocation function against NULL before dereferencing it, to avoid the segmentation fault caused by dereferencing a NULL pointer. In this lab, you will create a static tool to detect these NULL dereference errors for C/C++ programs. To do so, we will leverage bddbddb and bc2bdd, a bddbddb port to LLVM created by my research group.
Part A: Setup
You will conduct this programming lab on our server workbench.cs.columbia.edu. You will access this server using SSH. Your user name and default password is in your Courseworks Dropbox (Courseworks --> Files --> Dropbox). You are required to change your password on your first login. (Alternatively, if you have extensive experience with Linux environment, you may do this lab on your own machine, though the course staff won't be able to help you if you encounter any issues.)
The bc2bdd source files needed for this assignment are distributed using the Git distributed version control software. To get started, log on to workbench.cs.columbia.edu and run the following command
$ git clone /home/e6121/lab1to clone bc2bdd source code into your home directory. To learn about Git, take a look at the Git user's manual, or, if you are already familiar with other version control systems, you may find this Git overview useful. We'll learn a few more git commands for tracking source code changes later in this lab.
You'll also need to download LLVM 2.7 and the GCC frontend of LLVM. Download them to the lab1 directory you just created by running
$ cd lab1
$ wget http://llvm.org/releases/2.7/llvm-2.7.tgz
$ wget http://llvm.org/releases/2.7/llvm-gcc4.2-2.7-x86_64-linux.tar.bz2
Now that all source packages are ready, you'll start building and installing them. First, you need to install LLVM and its GCC front end by running
$ ./scripts/mk-llvm
in the same lab1 directory. Script mk-llvm will run for a while (twenty minutes or so). Once it finishes, it should install LLVM tools and LLVM GCC frontend to lab1/install. Double check that this is the case by verifying that programs llvm-gcc and opt are in the directory install/bin.
Next, in your shell, set environment variable LLVM_ROOT to the absolute path of your lab1 directory, and appending to PATH the absolute paths of lab1/install/bin and lab1/scripts. You must complete this step before proceeding to the next.
Next, build bc2bdd by running
$ cd bc2bdd
$ make ENABLE_OPTIMIZED=0
This command will take roughly three minutes. Once it finishes, test that bc2bdd is correctly built by running its testcases for alias analysis
$ cd tests/aa
$ make ENABLE_OPTIMIZED=0 runtests
If all goes well, you should see a bunch of output and many "..........Passed" messages, without any "..........Failed" message.
Part B: Understanding bc2bdd
The bc2bdd system represents a relationship between each program feature as a relationship between BDDs. To do this, LLVM Value pointers are assigned a positive integer. A representation of a particular value as a BDD is simply its number, represented in binary, given as a truth assignment to a set of BDD variables. Representing up 16 distinct values, for example, requires 4 bdd variables. Establish a relation between BDDs (for example represent the relationship of the statement x=y), the truth assignments must be concatenated. If each member of the relationship is represented by a disjoint set of BDD variables (this can be done by establishing a finite domain), this is simply done by "ANDing" the BDDs, similar to a bitwise AND. To add this relation information to the existing information (for example, say you want to add x=y to the existing set (y=z, z=w), this can be accomplished by "ORing" the new relation with the existing set.
Succinctly,
assignRelations |= finite_bdd(dom=0, id_of(x)) & finite_bdd(dom=1, id_of(y))
The benefit of using a BDD representation for these relations is that good variable orderings allow BDDs to compactly represent relations.
Once the appropriate relations are serialized to disk, they can be read by bddbddb. bddbddb is a Datalog interpreter for a subset of Datalog. It takes as input the initial relations and a Datalog program, which is a set of new relations and rules for deriving them. Bddbddb iterates over the rules, adding new relations until it reaches a fix-point. The resulting BDDs are serialized to disk and can be read back into LLVM by bc2bdd.
bc2bdd is implemented as an LLVM pass. It includes a set of default analyses, including a context-sensitive, field-sensitive alias analysis. Method Bc2BddPass::runOnModule in file bc2bdd/Bc2Bdd.cpp is the entry point of bc2bdd. This method first creates a set of BDD relations and domains, then traverses all global variables and instructions in an LLVM bitcode file (a Module) to collect program facts into the BDD relations, then invokes bddbddb to run Datalog files and solve relations, and finally reads back the BDD results for post-processing. You can generate and show the documentation of bc2bdd by running make showdoc.
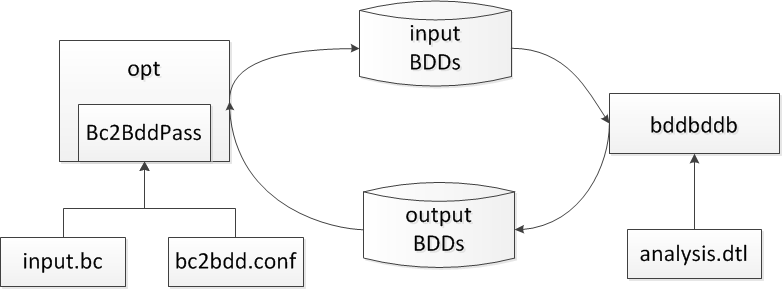
The figure above shows the architecture of bc2bdd. opt is an LLVM tool for running passes. input.bc is the program to analyze in LLVM bitcode format. bc2bdd.conf specifies configuration options for bc2bdd. analysis.dtl contains the analysis to run in Datalog.
Datalog files are stored in bc2bdd/perf with dtl extensions. Files with prefix pa_ are alias analyses; those with null_ are NULL dereference checkers which you will implement. fs means field-sensitive, and cs and ci mean context-sensitive or context-insensitive, respectively.
To understand the syntax of bddbddb's Datalog, please refer to the bddbddb tutorial. Here are two tips: (1) a Datalog rule must end with a period and (2) you can perform printf-style debugging on your Datalog file using the outputtuples qualifier, which requests bc2bdd to dump the tuples in a relation into a .csv file.
To specify what analysis to run, users can configure the "analysis" option in bc2bdd.conf. For example, file bc2bdd/test/aa/bc2bdd.conf includes the line
analysis=$LLVM_ROOT/bc2bdd/perf/pa_fs_ci_3summ.dtl $LLVM_ROOT/bc2bdd/perf/pa_cs_number_1.dtl $LLVM_ROOT/bc2bdd/perf/pa_fs_cs_3summ.dtl
which specifies three analyses to run in this order.
Part C: Implementing NULL Dereference Checker
For simplicity, we will use a very aggressive algorithm to detect NULL dereference errors. We first collect the set of all heap memory locations. For each heap location, we check if any pointer that may point to this location is ever compared against NULL using equality or inequality comparisons. If so, we consider that it is safe to dereference pointers to this heap location. Otherwise, we flag a NULL dereference error if a pointer to this heap location is dereferenced.
To understand LLVM and its API, pleaser refer to the LLVM API Documentation and LLVM Language Reference Manual. Note that these documents are for the latest stable version of LLVM, so they may be slightly inconsistent with LLVM 2.7. Read the LLVM 2.7 source code if necessary.
As you modify the source files, Git automatically tracks your changes. If you added a new file new-file-foo, you should tell Git to track this file by running
$ git add new-file-foo
To generate an intermediate checkpoint of the source files, you can commit your changes to your local repository by running
$ git commit -am 'checkpoint 1: added datalog rules'
[master 9bad18e] checkpoint 1: added datalog rules
 1 files changed, 1 insertions(+), 1 deletions(-)
You can also run git diff HEAD to see what you have changed since your last commit. To see what you've changed since you cloned the repository, run git diff origin/master.
After you modified or added files, run
$ make ENABLE_OPTIMIZED=0
again to re-build bc2bdd.
Part D: Applying NULL Dereference Checker to Coreutils
In this part, you'll apply the NULL dereference checker to coreutils, the set of core utilities such as ls provided by GNU. Get the source code of coreutils by running
$ apt-get source coreutils
Build coreutils using LLVM by running
$ cd coreutils-...
$ ./configure
$ make CC=llgcc -k
where llgcc is a wrapper to the LLVM GCC frontend. If make complains that it cannot find llgcc, check that your included lab1/scripts in your PATH.
Once make finishes, you should see many files with bc extensions in coreutils-version/src.
Submission Instructions
You are required to submit (1) a patch including all your source code changes to bc2bdd and (2) a text document listing all errors you detect in coreutils. You do not need to submit your answers to Exercise 1 or the raw results to Exercise 3. Create a zip archive including both the patch and the text document, and name it with your UNI. For instance, Alice Hacker with UNI alh2105 should name her submission lab1.alh2105.zip. You can then upload this patch to the submission folder for lab1 in Courseworks.
You can generate a patch including all your changes as follows. When you are ready to hand in your solution, commit all your changes, including the new files you added using the git commit command. Then, run git format-patch origin/master --stdout > lab1.patch to generate a patch of all source code changes you've made. It is important that you commit all your changes including the new files you added. Please manually inspect the patch to make sure it is the case.