NESTOR Web-Server Mobility Demo

The NESTOR system provides a platform for network configuration management automation. This page describes an on-line demonstration of the NESTOR system prototype. The demonstration consists of two hosts:
  1. A DNS domain name server host running BIND (referred as dns)
  2. An HTTP Web server host running Apache (referred as www)

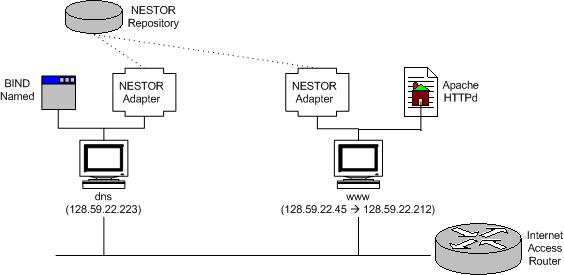
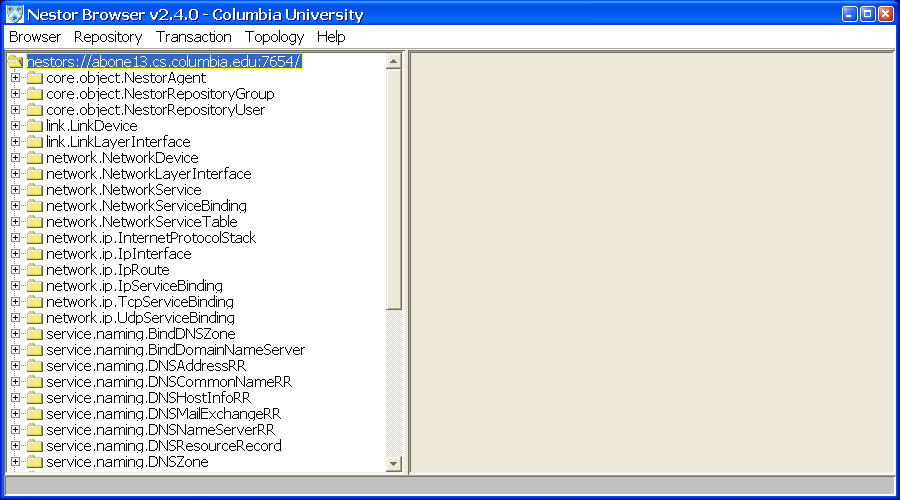
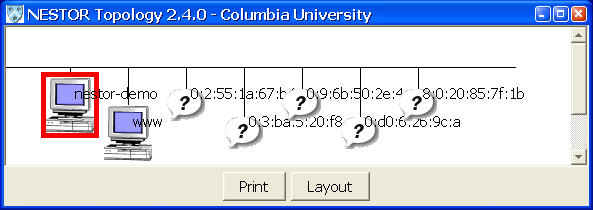
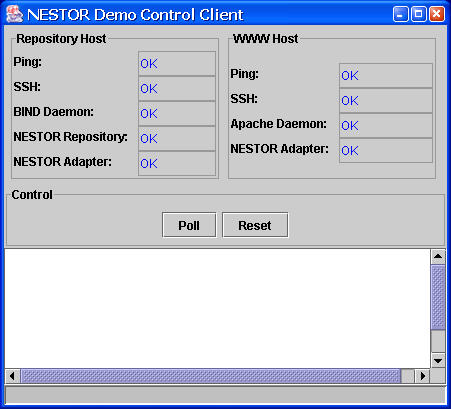
The DNS server is a master of the DNS zone nestor.cs.columbia.edu. The Web server is assigned to the DNS server's domain and is available under the name www.nestor.cs.columbia.edu. In addition to these two Internet services, the two hosts are running a NESTOR adapter which instrument their host and service configuration to a NESTOR repository running on the DNS host.

The two hosts are connected to a switched network that is connected to the Internet through an departmental access router. The host connectivity and services are shown in the diagram below:

Demo topology graph

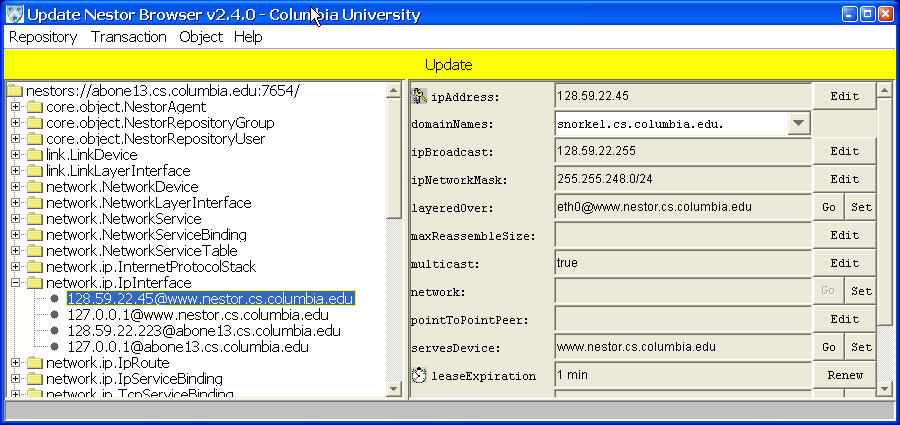
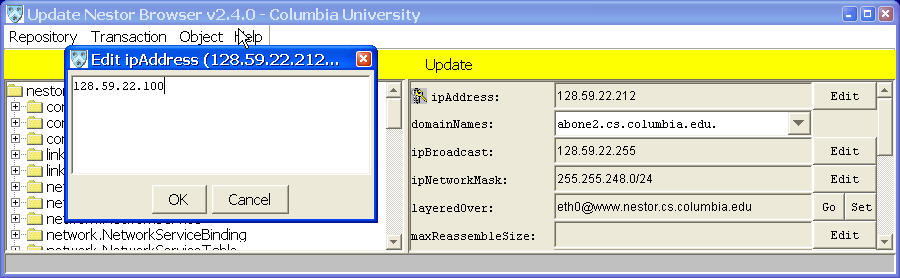
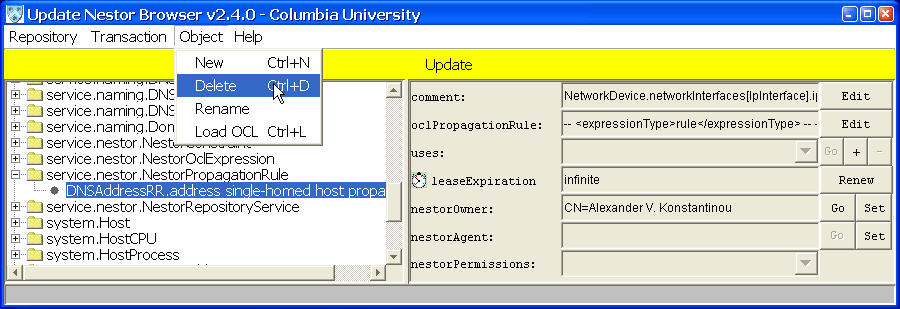
The demonstration involves reconfiguration of the web server's IP address through the repository, and automatic propagation of that change to the DNS database, through a NESTOR propagation rule.

Copyright

Copyright © 1996-2002 The Trustees of Columbia University in the City of New York. All rights reserved.

This software and documentation PROVIDED FOR USE IN A DARPA DEMONSTRATION PROJECT ONLY contain valuable trade secrets and proprietary information belonging to Columbia University. Decompiling, disassembling or reverse engineering (to the extent prohibited by applicable law) are explicitly prohibited. Except as required for use in the DARPA demonstration project, none of the foregoing material may be copied, duplicated or disclosed without the express written permission of Columbia University. COLUMBIA UNIVERSITY EXPRESSLY DISCLAIMS ANY AND ALL WARRANTIES CONCERNING THIS SOFTWARE AND DOCUMENTATION, INCLUDING ANY WARRANTIES OF NON-INFRINGEMENT OF INTELLECTUAL PROPERTY RIGHTS OF A THIRD PARTY, MERCHANTABILITY AND/OR FITNESS FOR ANY PARTICULAR PURPOSE, AND WARRANTIES OF PERFORMANCE, AND ANY WARRANTY THAT MIGHT OTHERWISE ARISE FROM COURSE OF DEALING OR USAGE OF TRADE. NO WARRANTY IS EITHER EXPRESS OR IMPLIED WITH RESPECT TO THE USE OF THE SOFTWARE OR DOCUMENTATION. Under no circumstances shall Columbia University be liable for incidental, special, indirect, direct or consequential damages or loss of profits, interruption of business, or related expenses which may arise from use of software or documentation, including but not limited to those resulting from defects in software and/or documentation, or loss or inaccuracy of data of any kind.

Requirements

  1. Internet connectivity (access behind firewall/NAT should work as well)

  2. Install the Sun Microsystems Java 1.4.0 or (1.4.1) Java Runtime Environment which includes the Java WebStart client. The browser has been tested on the Microsoft Windows XP, RedHat Linux 7.3, and Solaris 5.6 platforms. MacOSX compatibility has not been tested.

  3. Obtain a NESTOR user account and an associated Java keystore (guest users may perform read-only navigation by opening a guest user browse session.)

Initial State

  1. The network initial configuration is shown in the table below:

    HostAddress Services
    dns 128.59.22.223 DNS (bind), NESTOR repository NESTOR adapter
    www 128.59.22.45 HTTP (apache), NESTOR adapter

    The initial DNS configuration is shown in the table below:

    Resource Record Name Type Value
    www.nestor.cs.columbia.edu A 128.59.22.45

  2. Demonstrate that the www host is available by browsing the URL "http://www.nestor.cs.columbia.edu", as well as pinging:

    Ping successful

    Browse successful

  3. Start the a NESTOR authenticated user browsing session by clicking on the link (note that this requires issuing of a key; other users may select to start a guest (readonly) browsing session).

    If you get an option to save the link as a file, then your Java WebStart installation was not successful.

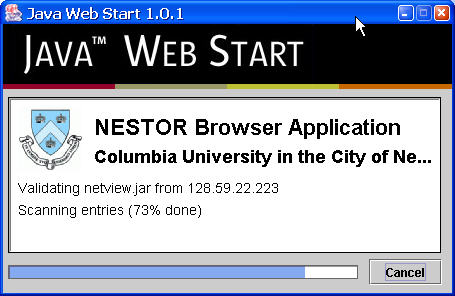
    The Java WebStart client will download the Java bytecode and cache it (so subsequent startup will be much faster). The initial download is about 7MB. If the demo installation is updated, you may notice that the browser reloading the updated version of the Java archive files.

    Webstart class load progress window

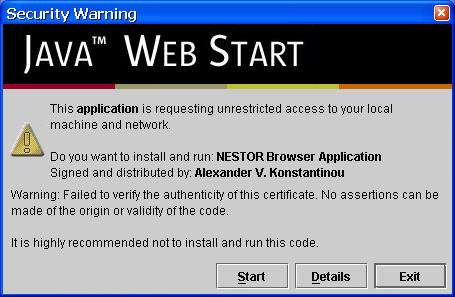
    During the first execution, you will be warned about code using an unverified signature requesting full permissions. To continue with the demo you'll have to click on Start.

    Webstart security warning

  4. Once the browser has been loaded and verified, the first window will request the SSL keystore and keystore password. Please point to the location where you have installed the keystore that was mailed to you, and provide the password selected.

    Browser keystore authentication window

  5. At this point, during the first execution of the browser, the demonstration license agreement will pop-up. Please read it carefully.

    NESTOR license agreement

  6. Finally, the browser window will open.

    Note:If you are behind a firewall and/or a NAT box, there may be a noticable delay (20 seconds) until the client gives up on receiving direct notifications and requests a port forwarding service from the repository. This will happen if the firewall does not send ICMP port unreachable messages.

    Browser initial view (class tree)

  7. [ Optional ] :Expand the system.LinuxHost tree node to show the objects for the two hosts. Navigate from the LinuxHost object to its networkInterfaces. Explore, the DNS address record, etc.

Changing the IP address of WWW

  1. Create a new transaction in the repository by selecting Transaction -> New (or pressing CTRL-N)

    Creating a transaction

  2. In the new window that opens, expand the network.ip.IpInterface tree node and select the object with interface 128.59.22.45

    Update transaction window

  3. Click on the Edit button next to the IP address, and in the window that opens, enter the new address 128.59.22.212, then click OK

    Editing the IP address attribute

  4. Commit the transaction by selecting Transaction -> Commit (or CTRL-S), and click YES in the confirmation window

    Committing a transaction

    Confirm commit

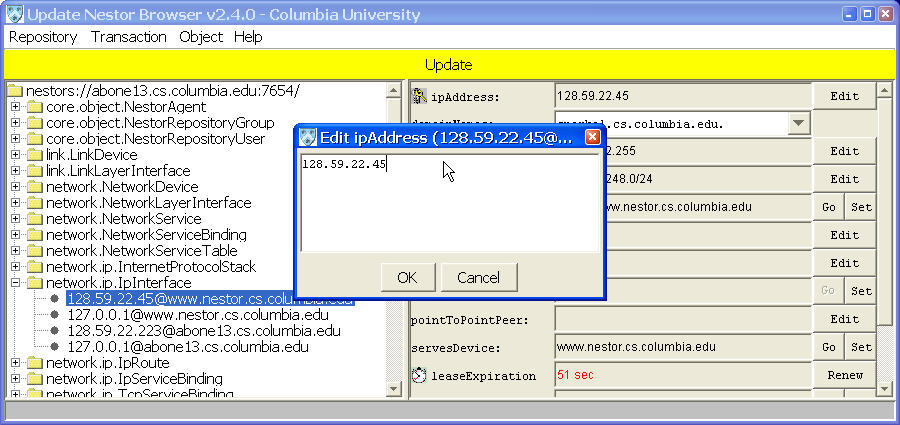
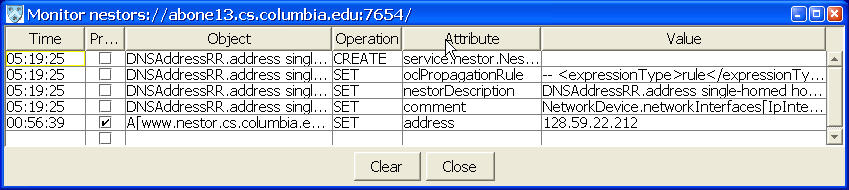
    If the transaction does not violate any constraints, it will be committed to the repository and the browser will indicate that the changes were committed. Before releasing the locks, the repository will propagate the change to the underlying NESTOR adapters (agents) that will perform the actual configuration change (IP address change in this case) on the host configuration.

    Note that the change demonstrated will also break the connection between the NESTOR adapter and the repository. The adapter will re-establish connection.

  5. Shift to the ping window and try to ping again. Note that the old IP address 128.59.22.45 is still the one being used.

    Ping fails

  6. Click reload on the browser and show that the web server is not available

    Browse fails

  7. Open a transaction monitor window by selecting Repository -> Monitor. The monitor window shows the log of committed transactions in the repository. This will be useful in showing how the propagation works.

    Monitoring repository operations

Adding the propagation rule

  1. Create a new transaction: Transaction -> New

  2. In the Object menu select Load OCL

    Loading an OCL propagation rule

  3. In the file chooser select the file DNSAddressRR_address.ocl that was provided with your keystore

    Choosing an OCL file

  4. Confirm the addition of the rule (as part of the transaction which will also need to be committed).

    Confirm OCL rule addition

  5. Commit the transaction: Transaction -> Commit

  6. In the transaction monitor window, you should have now seen that the current IP address of the web server has been propagated to its DNS address record.

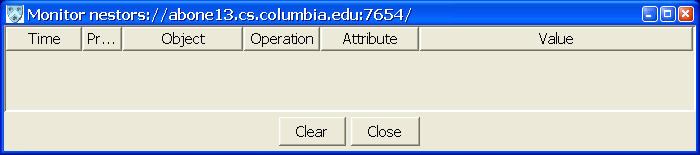
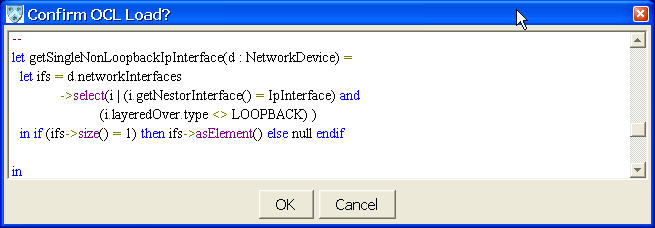
    Note that the log includes the operation for creating the constraint object, assigning the OCL expression loaded, and then the last operation has a checkmark, indicating it is a result of a propagation rule execution, which changes the DNS address record.

    You can click on the monitor Object column values to navigate to the effected object in the main browser. Also, when the attribute a relation, you can also click on the Value column to navigate to the target of the relation.

    Monitoring propagation

  7. Demonstrate that the host can be pinged

    Ping ok

  8. Close the browser window, re-open and then show that the URL www.nestor.cs.columbia.edu is now available.

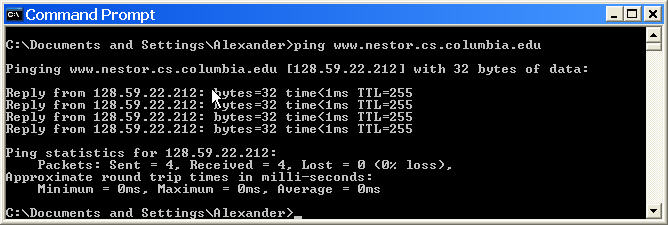
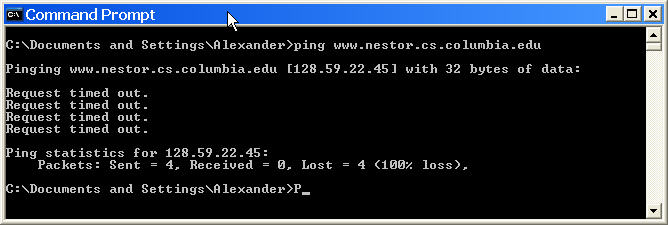
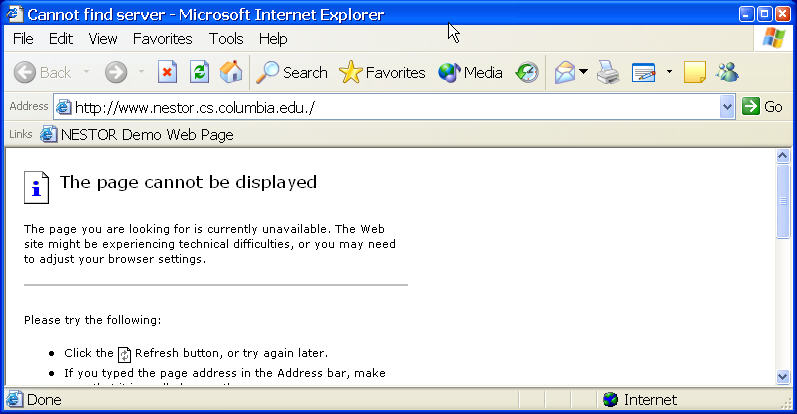
    Unfortunately, most DNS resolvers do not expose TTL expiration time for DNS RRs, and therefore browsers make a guess as to the caching time (somewhere between 20 minutes to an hour). CISCO makes a lot of money selling expensive port redirectors because of this limitation in browsers. By restarting, you're essentially clearing the application-level DNS cache (the resolver knows the TTL has expired and will make a new request).

    Browse ok

Demonstrate constraints

  1. It is also possible to now change the IP address back to 128.59.22.45 and show how the propagation will fix the new inconsistency immediately.

  2. I have specified some constraints on configuration which you can also show. For example, you can try to change the IP address to one thats not been allocated to the demo, and the constraint on available IP addresses will be violated. To do this, you will have to create a new transaction, locate the object, make the change, and then commit.

    Constraint violation attempt

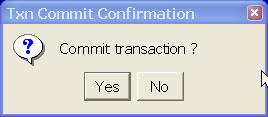
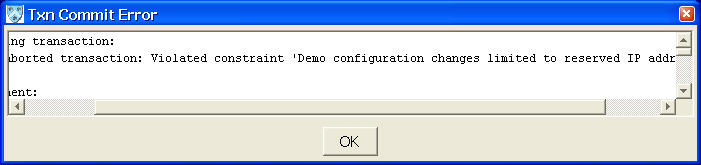
    After requesting Commit you should see a window reporting a constraint violation error which resulted in a transaction abort.

    Constraint violation error message

  3. Additional browser features include an automated topology discovery tool.

    topology Visualization tool

Return to initial state

  1. Create a transaction

  2. Change the IP address of the ww host back to 128.59.22.45 (if you have not done so already.

  3. Expand the service.nestor.nestorPropagationRule tree, select the DNSAddressRR.address ... object and then on the menu Object -> Delete, then commit the transaction as before.

    Deleting an object (propagation rule)

  4. Commit the transaction

Demo Management

Authorized users may reset the demo configuration using this Demo control WebStart application

Demo control (reset) utility

A shorter version of this page, with just the WebStart launch links is also available.


Please address all comments/questions to Alexander V. Konstantinou (akonstan@cs.columbia.edu)